Getting Ready to Go!
Odometer: 53512
Trip Meter 248 miles
A few facts about the weather in our hometown. Port Orford has had an average rainfall of 117.9 inches, which is 201% more than the average nationwide. Most of this rainfall happens in the months of October through May. June through September are typically sunny and dry.
This October has been exceptionally wet. We usually expect around 5" of rain in October- this year NOAA has recorded over 17" of rain for our fair city.
I share this not because we hate fall and winter here, I mention it because it really impacted our plans for maintenance and improvements to our home on wheels.

On the up-side, the Pacific storms did give us some great surf viewing down at the port.
One of the projects that we wanted to get accomplished was to find out why our main power awning would only deploy a few inches before it would jam up, and threaten not to re-stow itself. The project got bigger when we discovered that the awning fabric was all crunchy and tearing in some strategic places. Thanks to YouTube, and several internet forums, Joan and I decided that with a little help we could disassemble and reassemble the awning ourselves. We measured the old fabric and got online with Tough Tops to order a new one, then, between major rain events, we started the disassembly.

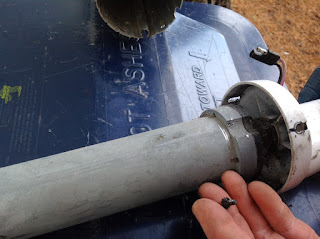
We removed the motor from the end of the awning tube
 Removed the old awning fabric...


Then finally...

Almost before we knew it- we had done it again- we were ready to go. Let's get on with the winter of 2016/17 !
Your Traveling Friends,
Jeff and Joan
Trip Meter 248 miles
A few facts about the weather in our hometown. Port Orford has had an average rainfall of 117.9 inches, which is 201% more than the average nationwide. Most of this rainfall happens in the months of October through May. June through September are typically sunny and dry.
This October has been exceptionally wet. We usually expect around 5" of rain in October- this year NOAA has recorded over 17" of rain for our fair city.
I share this not because we hate fall and winter here, I mention it because it really impacted our plans for maintenance and improvements to our home on wheels.

On the up-side, the Pacific storms did give us some great surf viewing down at the port.
One of the projects that we wanted to get accomplished was to find out why our main power awning would only deploy a few inches before it would jam up, and threaten not to re-stow itself. The project got bigger when we discovered that the awning fabric was all crunchy and tearing in some strategic places. Thanks to YouTube, and several internet forums, Joan and I decided that with a little help we could disassemble and reassemble the awning ourselves. We measured the old fabric and got online with Tough Tops to order a new one, then, between major rain events, we started the disassembly.

We removed the motor from the end of the awning tube


When we removed the motor from the end of the roller tube we found a loose screw that was the reason for the awning seizing up as the motor and tube rotate around each other. It was easy enough to re-install the screw (and tighten up the other two remaining screws). I used a dab of silicone caulk to ensure they didn't fall out again.

The new fabric arrived and with the help of our neighbors we got it installed. One job done and ten more to do.
The next project was to replace our aging electrical umbilical cord from the motorhome to the toad through the tow bar.

Nothing looks amiss here does it? Believe it or not, this old crusty plug was working flawlessly and with the new one the turn signals keep dropping out. When we are stationary for more than a few hours I will need to dig into the socket on the car, as I suspect that is where the trouble lies.
One last project was to install our wifi antenna on the motorhome.


We elected to remove the old CB radio antenna which we have never used, and to use that existing hole in the roof to pass the Cat 5 cable through to the overhead cabinet where the TV/DVD equipment lives. Well, apparently, the CB antenna was put on with the roof during manufacture, because the nut holding it in place was above the carpeted ceiling above the driver's seat. To get the nut loose I had to pull down the ceiling covering (I call it "carpet") in one of the adjacent cabinets [middle picture] and then use a 4" hole saw on the 1/8" plywood ceiling to get a "hand hole" to the area above the ceiling. I could just barely reach the nut with a box-end wrench to get it off. The rest of the install went fairly well. I sealed the wifi antenna and cable penetration with Sika construction caulk.
A little Dan Tack aerosol contact cement fixed the 'carpet' back to the ceiling covering my 4" hole beautifully. The cable runs inside the coach through the cabinets over the windshield and down the passenger side to our dining table, where we installed the Mini router, and plugged it into an adjacent 110V outlet.
Next we turned our attention to the care and feeding of the kitty cat that powers our rolling home. Our Cat 330hp turbo-diesel takes a whopping 19 quarts of oil with each oil and filter change- and it's time to do that now-
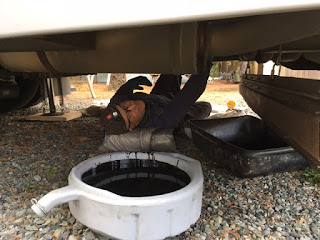
Three more quarts and another filter change and the Onan Quiet Diesel genset is good to go for another 6 months too. It's a good time to crawl underneath from one end to the other to look things over and hit each Zerk fitting with some grease.

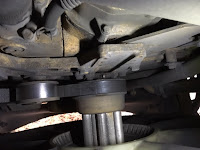
The final bearing that needs to be greased is only accessible by taking the bed completely apart and lifting the steel covers underneath. This is the infamous fan bearing, which often gets overlooked
There are more projects, but they will have to wait, because it is now time to winterize the house and finish loading the bus.

This summer we added water and waste lines out to our motorhome pad and when we did, we also incorporated drain valves into all the major plumbing lines in the house, that allow us to very quickly and easily shut off the water to the house, and drain all the hot and cold water lines both in the house and out to the yard hydrants.
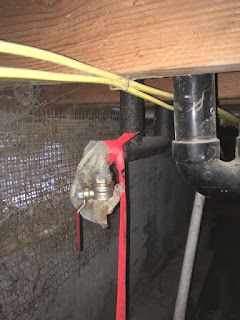
I still have to manually drain the water heater with a garden hose and then crawl under the house to open up the low-point drain valves. The valve shown in the photo to the right, has polyester mesh over it to keep insects from crawling in the open valve and nesting. The red flagging tape alerts that the valve is still open and must be closed before restoring water to the house.
Then finally...

Almost before we knew it- we had done it again- we were ready to go. Let's get on with the winter of 2016/17 !
Your Traveling Friends,
Jeff and Joan
Comments
Post a Comment