Get Ready, Get Set, and Go !
Odometer 66342
It's getting to the end of the summer and the nomad in me is thinking it's time to head south for the winter months.
Deferred maintenance on our rolling home has caught up to me and I must dig my way out!
The scariest thing on my list was to replace the air dryer. On heavy motor homes that are built on diesel truck chassis, or a custom RV chassis like mine they use compressed air to do the braking. The air in the lines have to be kept clean and moisture free to ensure that the brake components do not corrode and to ensure that ice does not form in the lines and valves in freezing weather. To accomplish this, the manufacturers install an air line dryer such the Pure Air brand that we have.
I elected to remove the whole system and do the cleaning and filter change on my workbench. Part of the reason was to be able to see what I was doing, since this is my first time doing this, and secondly I wanted to keep dirt from the chassis from falling in the open top as I removed the filter.
This maintenance is supposed to be performed every three years and since I live part time at the coast, and since I know that it's not been done since 2012- it has to be done this year.
There are two main hoses and a third smaller hose that have to be disconnected, then the heater wires have to be unplugged. I make sure that each junction is thoroughly cleaned before taking it apart, and then the ends of the hoses are capped with a rubber glove and taped to ensure no dirt or moisture gets in. Lastly the bracket is removed (a band and a mounting bolt) so I can slowly lower the dryer from the chassis mount and crawl out from under the motor home with it.
Before I open anything up, and while all the ports are plugged with tape or fingers cut from a rubber glove, I use a stiff brush and Simple Green to clean the exterior, then a wire brush on an air grinder. For the final exterior finish, I cleaned with NAPA paint prep and sprayed on clear enamel just to ease the maintenance next time around. Could have used black or any other color, but I happened to have some clear that I used on my car wheels left over in the cabinet and thought- why not? This thing sits right behind the right hand rear duals and it was grungy.
Picture (right) shows the reason you need to do this regularly. Water and dirt will build up when the desiccant gives up.
Next task was to change out the oil in our front hubs with new synthetic 75w-90. It hasn’t been changed to my knowledge- and I have not been checking the levels as I should.

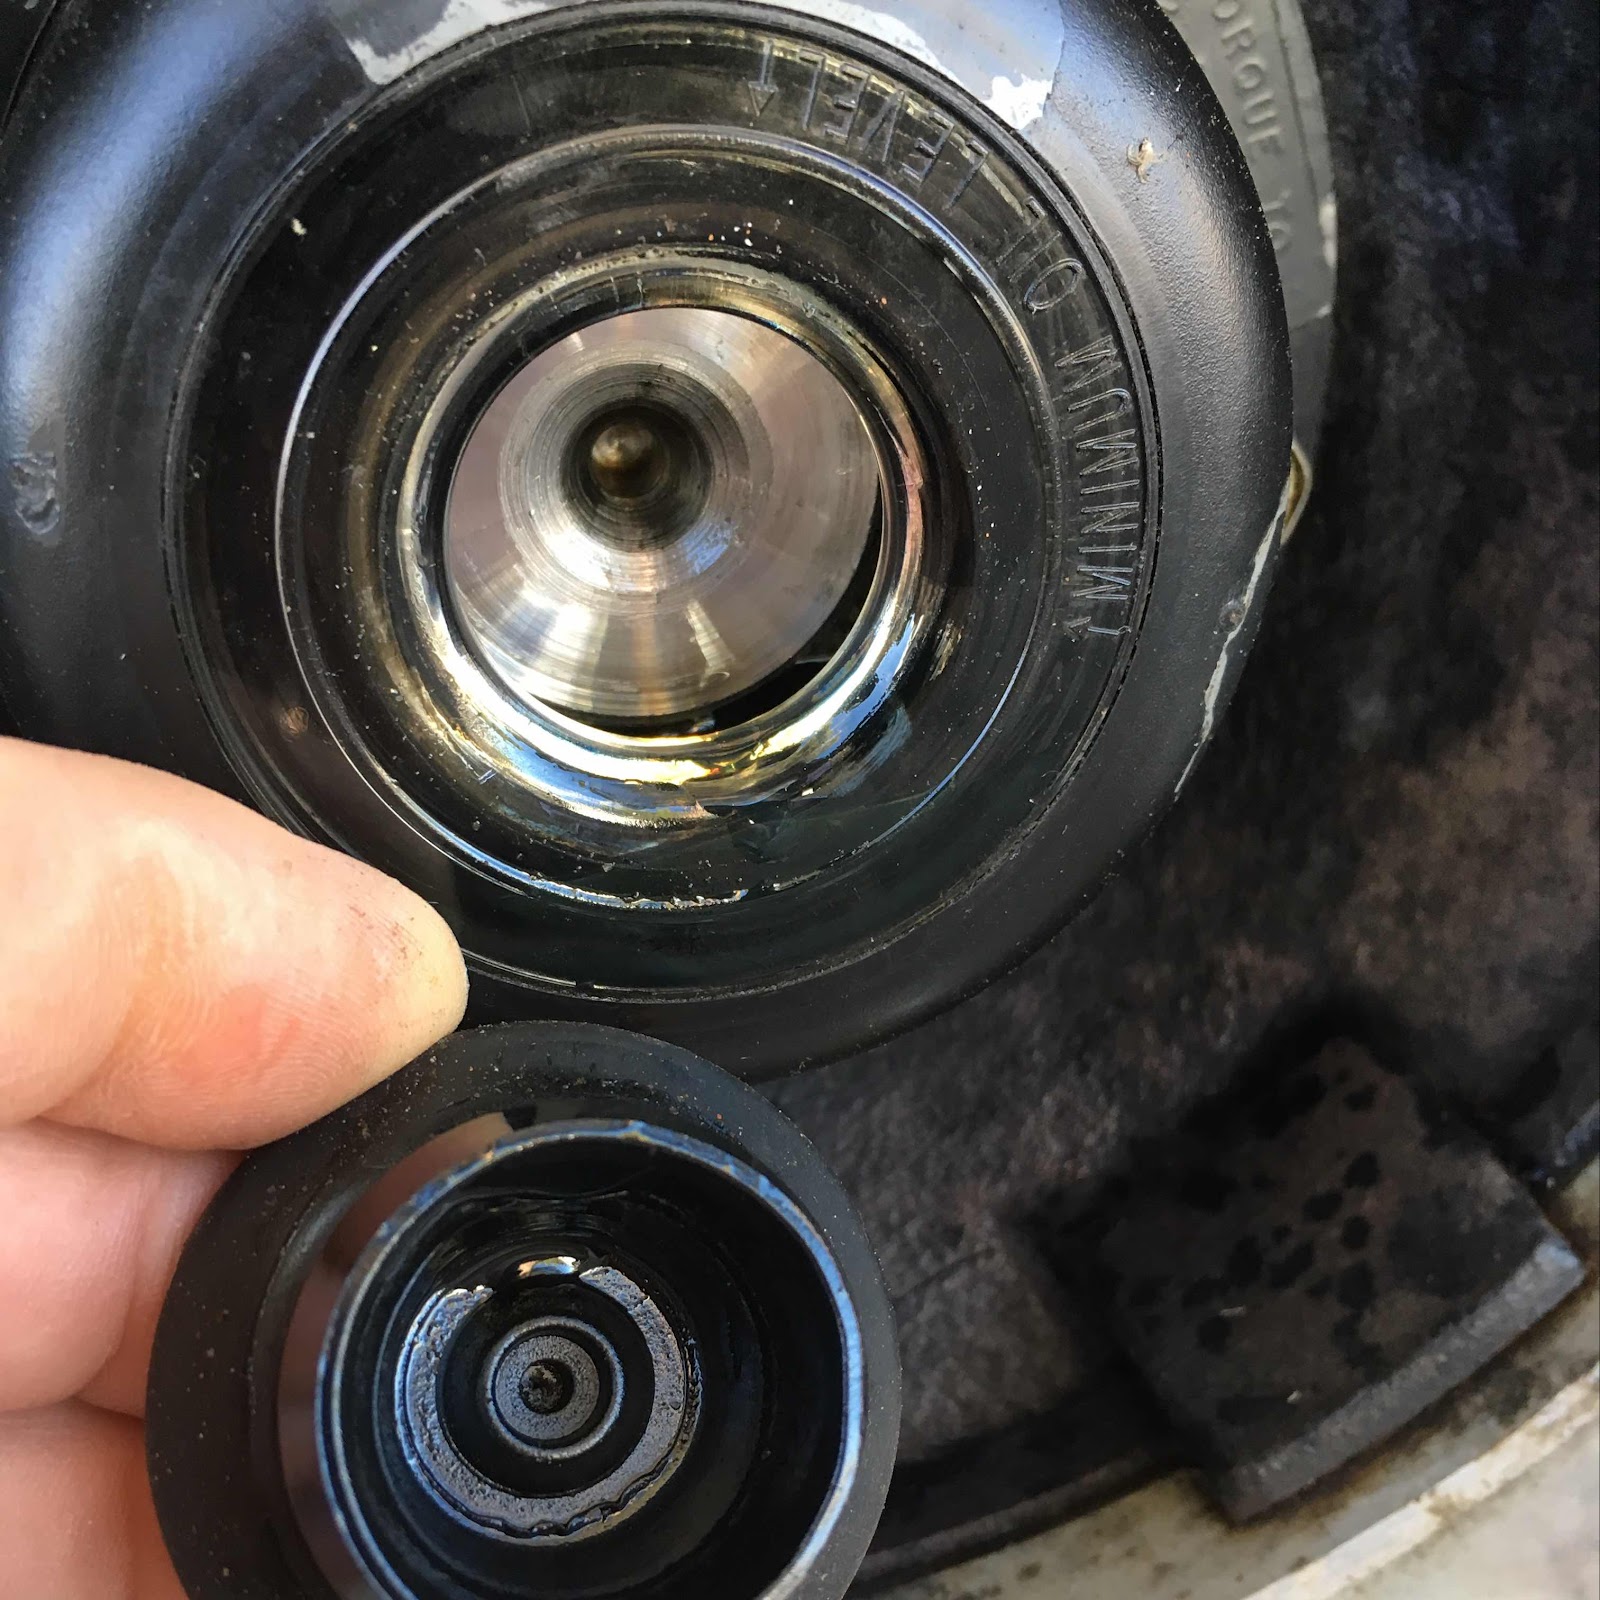
the hub has a clear plastic viewing window with a rubber plug in the center. On my Meritor axle the oil level should be between the concentric line in the plastic and the hole the plug was removed from.
I first chocked the rear wheels, then raised the front wheel off the ground just enough to rotate the drain to the 6 o’clock position and with the help of an aluminum foil shield, drained the axle hubs overnight. The next day I added synthetic 75w- 90 weight oil while spinning the tire around to help the oil flow through the bearings. I did this several times during the day, letting the oil level stabilize
If your clear plastic is not “clear “, as mine was not- you’ll have to use a rag on your pinky finger to scrub the carbon black off the inside (oil side) of the plastic to where you can see through it to check the oil level.
Time to start loading up for the long vacation.
After filling the water tank with fresh water I noticed that the water on the hot side of the faucets was not flowing. I double checked that the diverter valves on the wet-bay valve panel were all in the correct position. My first guess was the check valve leading into or out of the hot water heater was stuck in the closed position.
This has happened to me before.
When we got to Medford we went to Jackson RV supply and purchased a replacement.
On our return to the RV Park I surreptitiously jacked up the leveling jacks in the rear of the bus and slid under to open the access panel on the water heater enclosure. In a previous repair, I had made these parts a lot more accessible so the change-out was real quick. Hot water! Yea!
While we are at the plumbing task- Joan wants a new kitchen faucet - so off to Home Depot where we bought both a kitchen faucet and a lavatory faucet
We found a very nice single handle faucet in brushed nickel with pull out sprayer.
I’ve found the the Pex fittings the RV industry uses are hard to adapt to. I just cut out the old plumbing and use Sharkbite press-on fittings to re-plumb. This comes at a cost however. It undoubtedly sped up the job while making it 100% leak proof, but costs about $8-$10 per fitting. (Shinny brass fittings shown it picture above). The pipes on my replacement faucet were substantially longer than the original, making it necessary to use flex supply hoses in my install.
Of course with RV Plumbing one has to disassemble a whole lot of cabinetry to get at the pipes. All went well and now I'm a hero...

We like the Southern Oregon RV Park At Medford's Jackson County Expo Center. SO RV is centrally located, clean and newish, and reasonably priced!

Beautiful sunset over Rogue valley
After shopping groceries and finishing the faucet installs -

Tucked in for the night at Susanville RV
I re-learned a lesson with this blog. Most of these photos were on my phone, so I decided to use an app to load them into the blog. It worked like a charm- only it does something to the photos and I can't resize them like I would normally be able to do. Live and re-learn :-<(

next blog- We visit the old west ghost town of Bodie, CA
Port Orford, OR
Welcome back to Jeff and Joan's blog for another season!
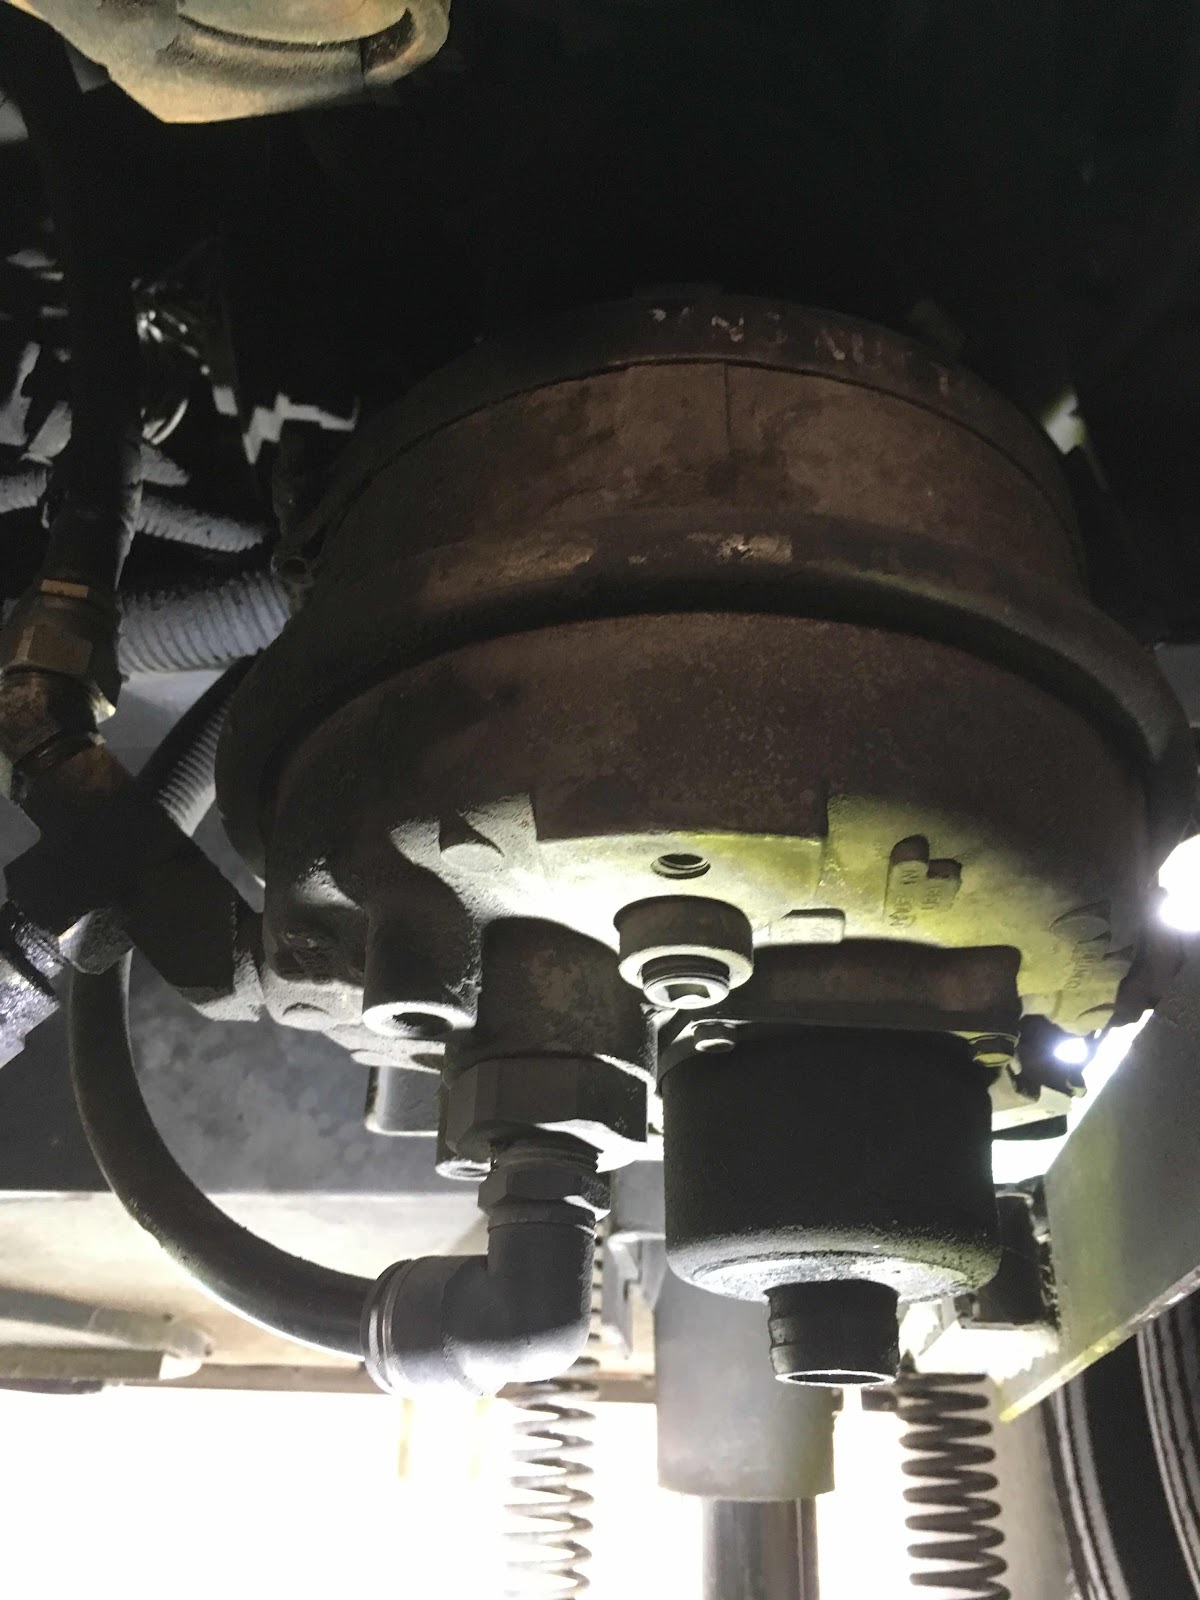 |
| Pure Air air dryer with Haldex filters |
Deferred maintenance on our rolling home has caught up to me and I must dig my way out!
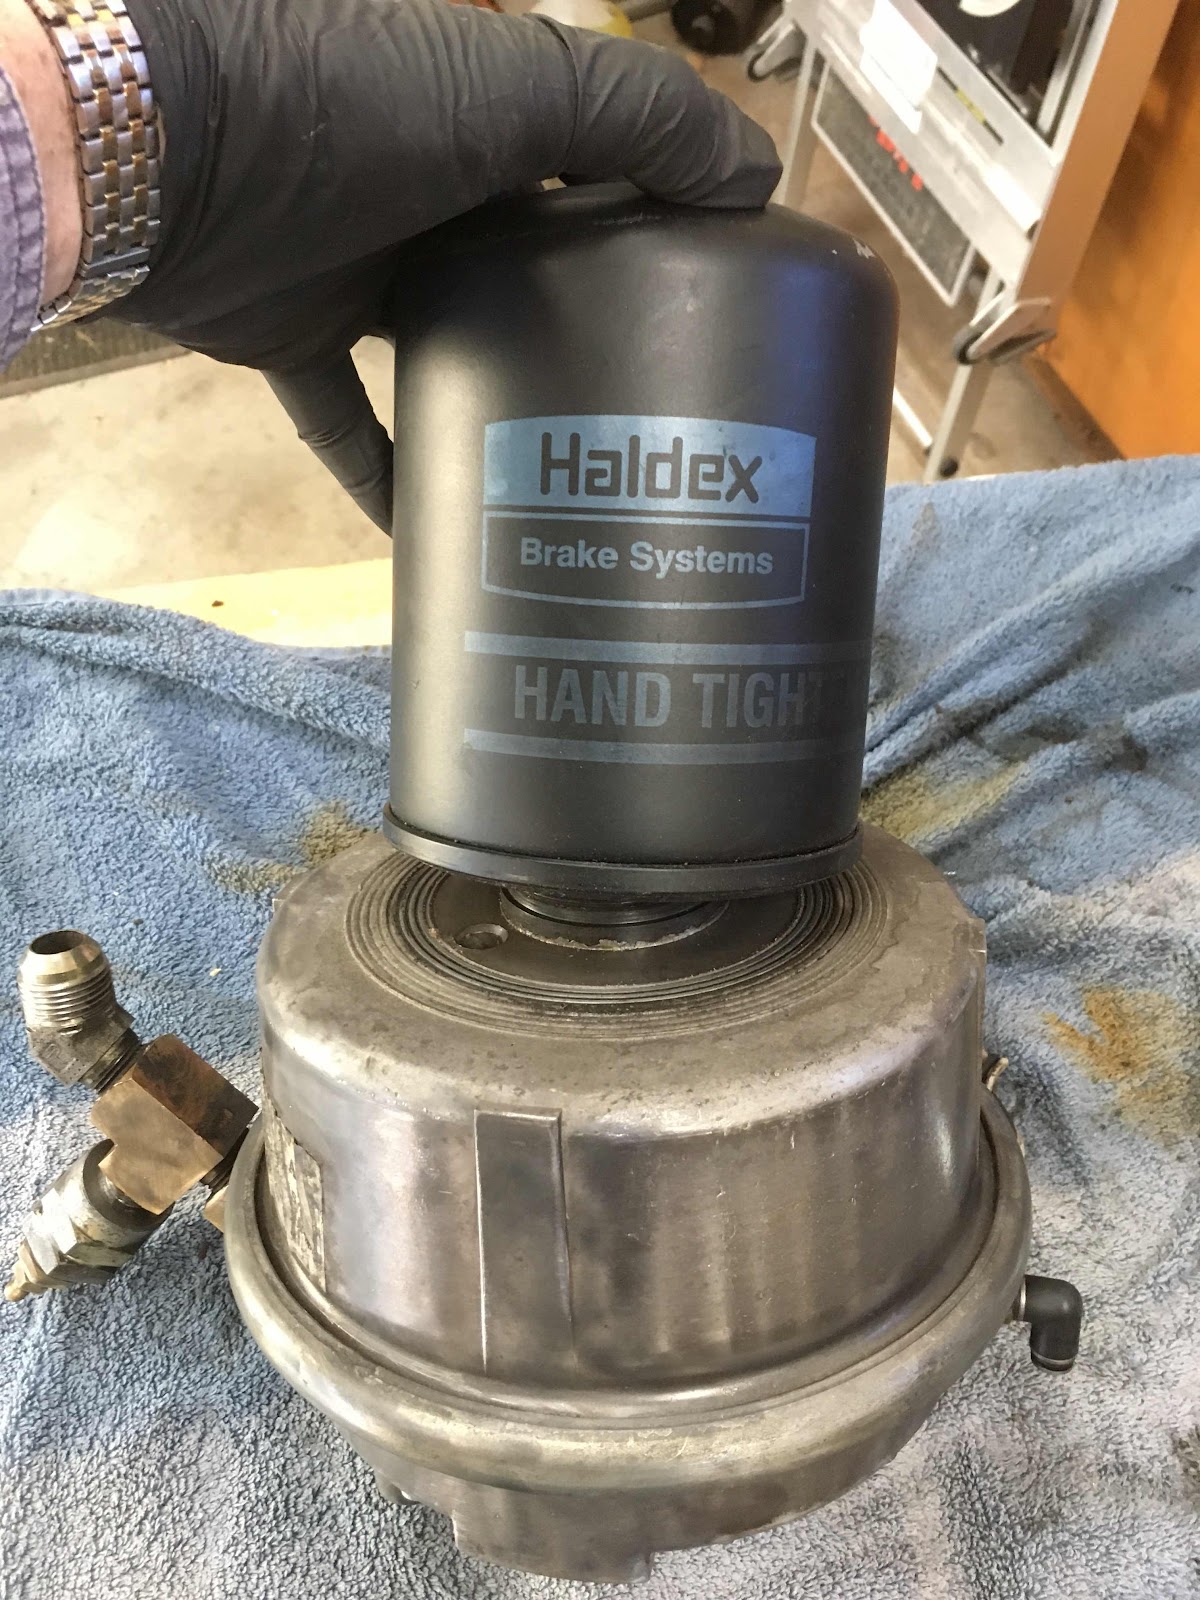 |
| Removing the desiccant filter canister |
This maintenance is supposed to be performed every three years and since I live part time at the coast, and since I know that it's not been done since 2012- it has to be done this year.
There are two main hoses and a third smaller hose that have to be disconnected, then the heater wires have to be unplugged. I make sure that each junction is thoroughly cleaned before taking it apart, and then the ends of the hoses are capped with a rubber glove and taped to ensure no dirt or moisture gets in. Lastly the bracket is removed (a band and a mounting bolt) so I can slowly lower the dryer from the chassis mount and crawl out from under the motor home with it.
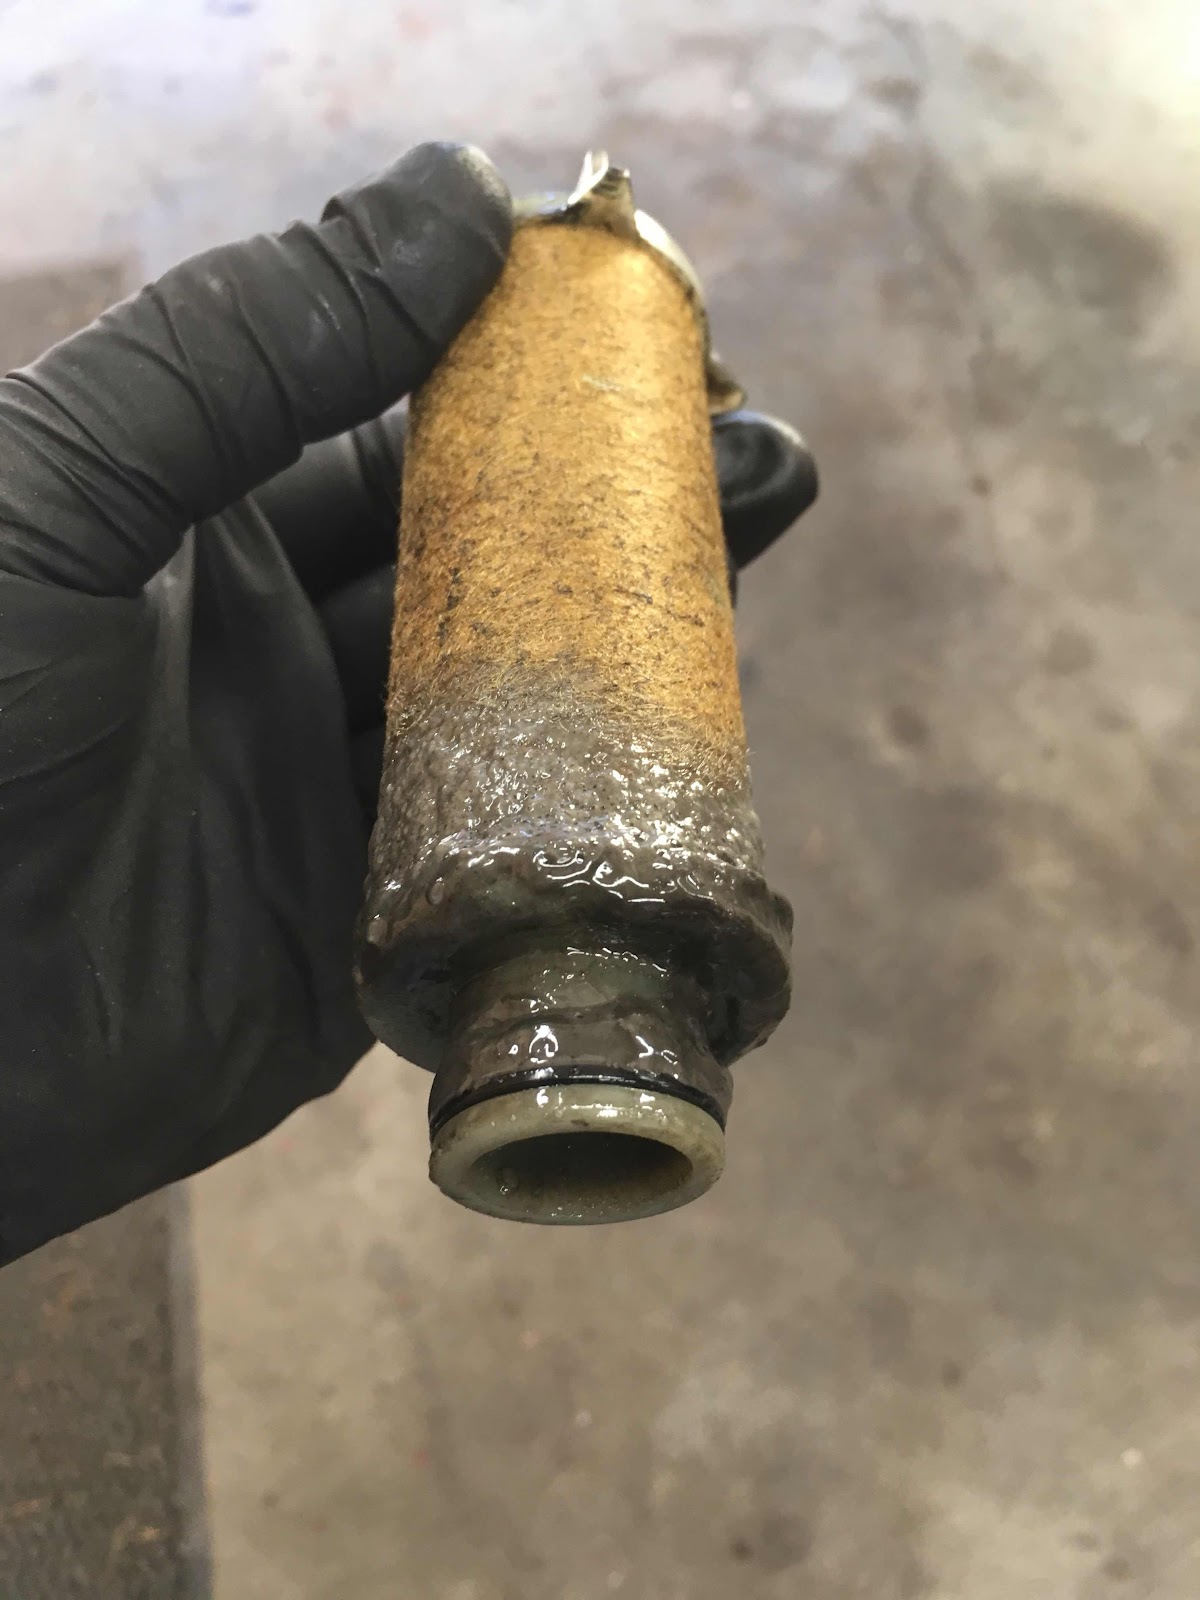 |
| Inner filter removed from desiccant filter |
Before I open anything up, and while all the ports are plugged with tape or fingers cut from a rubber glove, I use a stiff brush and Simple Green to clean the exterior, then a wire brush on an air grinder. For the final exterior finish, I cleaned with NAPA paint prep and sprayed on clear enamel just to ease the maintenance next time around. Could have used black or any other color, but I happened to have some clear that I used on my car wheels left over in the cabinet and thought- why not? This thing sits right behind the right hand rear duals and it was grungy.
Picture (right) shows the reason you need to do this regularly. Water and dirt will build up when the desiccant gives up.
Next task was to change out the oil in our front hubs with new synthetic 75w-90. It hasn’t been changed to my knowledge- and I have not been checking the levels as I should.
To check the level all you need to do is remove the center hub cap to gain access to the hub, and clean carefully around the removable rubber plug

the hub has a clear plastic viewing window with a rubber plug in the center. On my Meritor axle the oil level should be between the concentric line in the plastic and the hole the plug was removed from.
 |
| An aluminum foil bib saves the wheel and tire from the oil |
I first chocked the rear wheels, then raised the front wheel off the ground just enough to rotate the drain to the 6 o’clock position and with the help of an aluminum foil shield, drained the axle hubs overnight. The next day I added synthetic 75w- 90 weight oil while spinning the tire around to help the oil flow through the bearings. I did this several times during the day, letting the oil level stabilize
between top offs.
 |
| Add caption |
If your clear plastic is not “clear “, as mine was not- you’ll have to use a rag on your pinky finger to scrub the carbon black off the inside (oil side) of the plastic to where you can see through it to check the oil level.
Time to start loading up for the long vacation.
After filling the water tank with fresh water I noticed that the water on the hot side of the faucets was not flowing. I double checked that the diverter valves on the wet-bay valve panel were all in the correct position. My first guess was the check valve leading into or out of the hot water heater was stuck in the closed position.
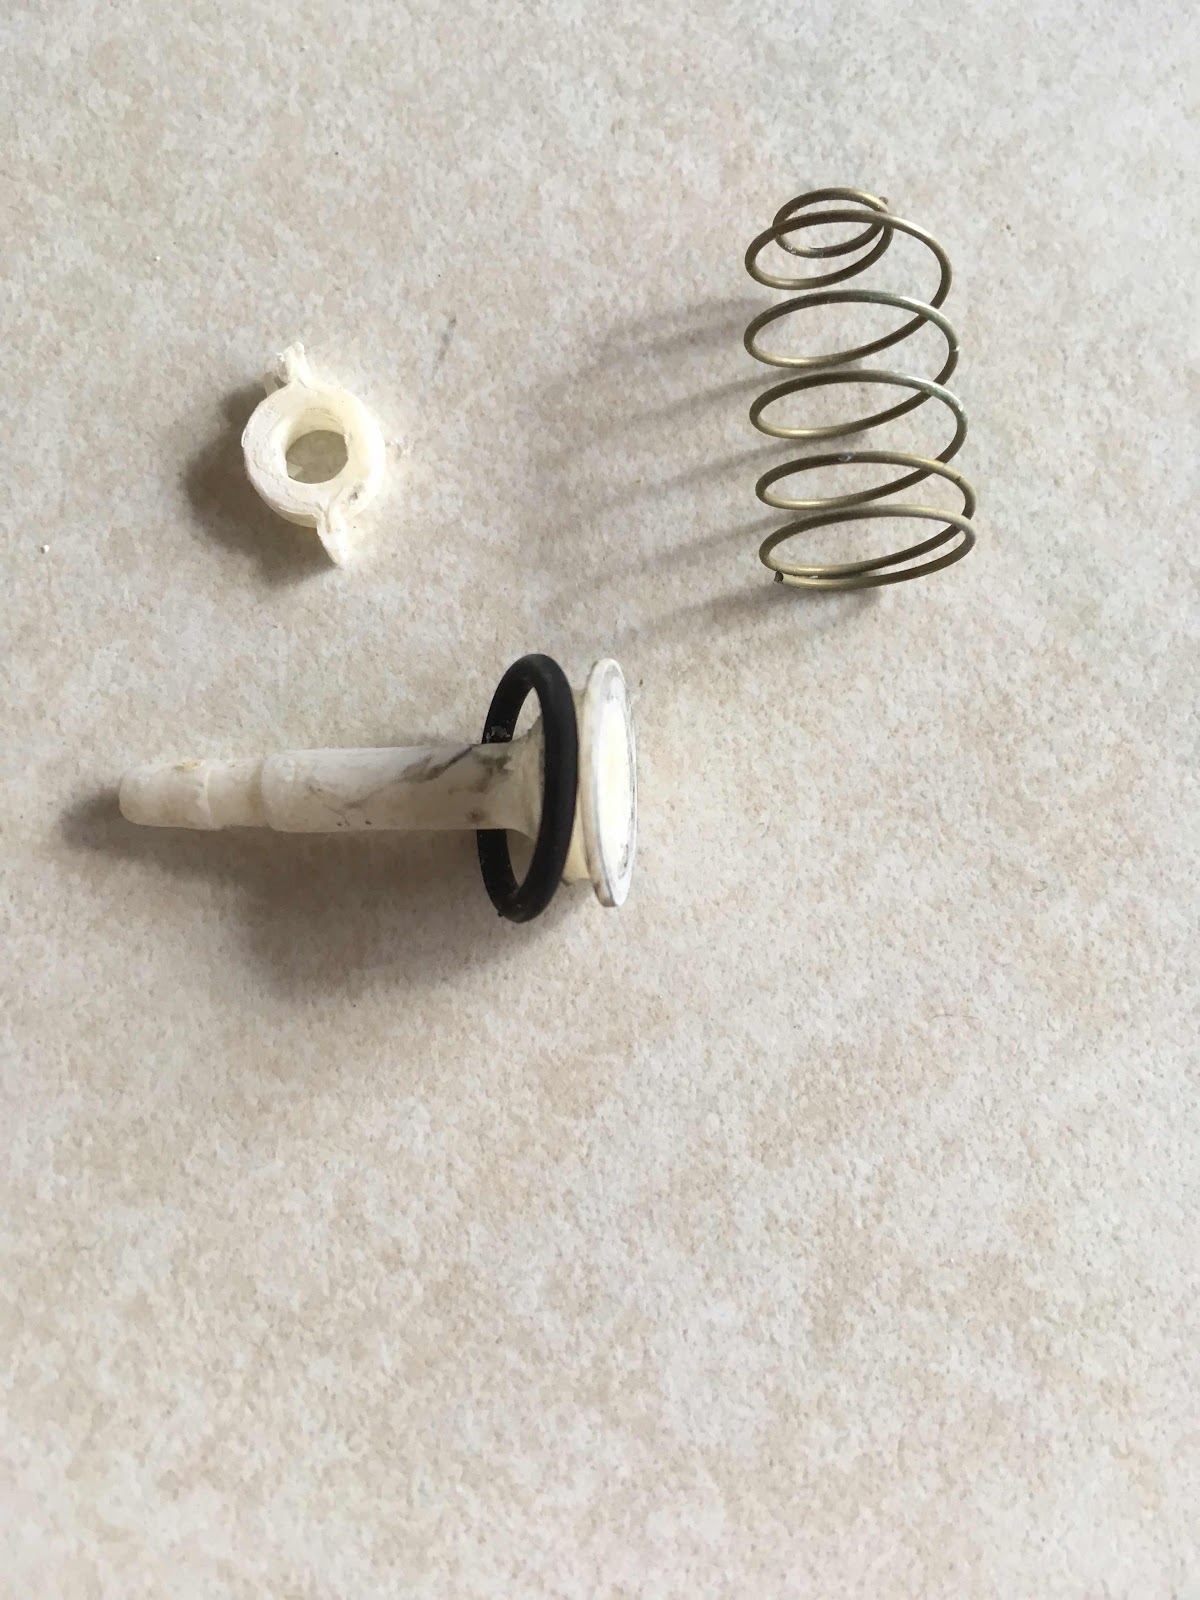 |
| This small parts fell out of the check valve into my hand |
 |
| Check Valve |
When we got to Medford we went to Jackson RV supply and purchased a replacement.
On our return to the RV Park I surreptitiously jacked up the leveling jacks in the rear of the bus and slid under to open the access panel on the water heater enclosure. In a previous repair, I had made these parts a lot more accessible so the change-out was real quick. Hot water! Yea!
While we are at the plumbing task- Joan wants a new kitchen faucet - so off to Home Depot where we bought both a kitchen faucet and a lavatory faucet
 |
| New Kholer Brushed Nickel Kitchen Faucet |
 |
| Add caption |
Of course with RV Plumbing one has to disassemble a whole lot of cabinetry to get at the pipes. All went well and now I'm a hero...
We like the Southern Oregon RV Park At Medford's Jackson County Expo Center. SO RV is centrally located, clean and newish, and reasonably priced!
Beautiful sunset over Rogue valley
After shopping groceries and finishing the faucet installs -
We just had time to fix a quick dinner and crawl into bed
Thursday morning we had breakfast with Doug and Kathy before setting off for Susanville, CA on a bright and beautiful sunny day
Medford to Susanville is just about the right distance for us in the early part of our migration south
Tucked in for the night at Susanville RV
I re-learned a lesson with this blog. Most of these photos were on my phone, so I decided to use an app to load them into the blog. It worked like a charm- only it does something to the photos and I can't resize them like I would normally be able to do. Live and re-learn :-<(
Your Traveling Friends
Jeff and Joan
next blog- We visit the old west ghost town of Bodie, CA


Comments
Post a Comment